
[1~2] 다음 TV 클래스가 있다.
class TV {
	private int size;
	public TV(int size) { this.size=size; }
	protected int getSize() { return size; }
}
1. 다음 main( ) 메소드와 실행 결과를 참고하여 TV를 상속받은 ColorTV 클래스를 작성하라.
public static void main(String[] args) {
	ColorTV myTV=new ColorTV(32, 1024);
	myTV.printProperty();
}
--출력--
32인치 1024컬러public class ColorTV extends TV {
private int color;
public ColorTV(int size, int color) {
super(size);
this.color=color;
}
void printProperty() {
System.out.println(getSize()+"인치 "+color+"컬러");
}
public static void main(String[] args) {
// TODO Auto-generated method stub
ColorTV myTV=new ColorTV(32, 1024);
myTV.printProperty();
}
}
2. 다음 main( ) 메소드와 실행 결과를 참고하여 문제 1의 ColorTV를 상속받는 IPTV 클래스를 작성하라.
public static void main(String[] args) {
	IPTV iptv=new IPTV("192.1.1.2",32,2048); //"192.1.1.2" 주소에 32인치, 2048컬러
	iptv.printProperty();
}
--출력--
나의 IPTV는 192.1.1.2 주소의 32인치 2048컬러public class IPTV extends ColorTV{
private String address;
public IPTV (String address,int size,int color) {
super(size,color);
this.address=address;
}
void printProperty() {
System.out.print("나의 IPTV는 "+address+" 주소의 ");
super.printProperty();
}
public static void main(String[] args) {
// TODO Auto-generated method stub
IPTV iptv=new IPTV("192.1.1.2",32,2048);
iptv.printProperty();
}
}
[3~4] 다음은 단위를 변환하는 추상 클래스 Converter이다.
import java.util.Scanner;
abstract class Converter {
	abstract protected double convert(double src); // 추상 메소드
	abstract protected String getSrcString(); // 추상 메소드
	abstract protected String getDestString(); // 추상 메소드
	protected double ratio; // 비율

	public void run() {
		Scanner scanner=new Scanner(System.in);
		System.out.println(getSrcString()+"을 "+getDestString()+" 로 바꿉니다.");
		System.out.print(getSrcString()+"을 입력하세요>> ");
		double val=scanner.nextDouble();
		double res=convert(val);
		System.out.println("변환 결과: "+res+getDestString()+"입니다");
		scanner.close();
	}
}
3. Converter 클래스를 상속받아 원화를 달러로 변환하는 Won2Dollar 클래스를 작성하라. main( ) 메소드와 실행 결과는 다음과 같다.
public static void main(String[] args) {
	Won2Dollar toDollar=new Won2Dollar(1200); // 1달러는 1200원
	toDollar.run();
}
--출력--
원을 달러 로 바꿉니다.
원을 입력하세요>> 24000
변환 결과: 20.0달러입니다public class Won2Dollar extends Converter {
protected double convert(double src) { return src/ratio; }
protected String getSrcString() { return "원"; }
protected String getDestString() { return "달러"; }
Won2Dollar(double ratio) { this.ratio=ratio; }
public static void main(String[] args) {
// TODO Auto-generated method stub
Won2Dollar toDollar=new Won2Dollar(1200);
toDollar.run();
}
}
4. Converter 클래스를 상속받아 Km를 mile(마일)로 변환하는 Km2Mile 클래스를 작성하라. main( ) 메소드와 실행 결과는 다음과 같다.
public static void main(String[] args) {
	Km2Mile toMile=new Km2Mile(1.6); // 1마일은 1.6Km
	toMile.run();
}
--출력--
Km을 mile 로 바꿉니다.
Km을 입력하세요>> 30
변환 결과: 18.75mile입니다public class Km2Mile extends Converter {
protected double convert(double src) { return src/ratio; }
protected String getSrcString() { return "Km"; }
protected String getDestString() { return "mile"; }
Km2Mile (double ratio) { this.ratio=ratio; }
public static void main(String[] args) {
// TODO Auto-generated method stub
Km2Mile toMile=new Km2Mile(1.6);
toMile.run();
}
}
[5~8] 다음은 2차원 상의 한 점을 표현하는 Point 클래스이다.
class Point {
	private int x,y;
	public Point(int x, int y) {this.x=x; this.y=y;}
	public int getX() {return x;}
	public int getY() {return y;}
	protected void move(int x, int y) { this.x=x; this.y=y;}
}
5. Point를 상속받아 색을 가진 점을 나타내는 ColorPoint 클래스를 작성하라. 다음 main( ) 메소드를 포함하고 실행 결과와 같이 출력되게 하라.
public static void main(String[] args) {
	ColorPoint cp=new ColorPoint(5,5,"YELLOW");
	cp.setXY(10,20);
	cp.setColor("RED");
	String str=cp.toString();
	System.out.println(str+"입니다.");
}
--출력--
RED색의 (10,20)의 점입니다.public class ColorPoint extends Point {
private String color;
ColorPoint (int x, int y, String color) {
super(5,5);
this.color=color;
}
void setXY(int x, int y) {move(x,y);}
void setColor(String color) {this.color=color;}
public String toString() {
return (color+"색의 ("+getX()+","+getY()+")의 점");
}
public static void main(String[] args) {
// TODO Auto-generated method stub
ColorPoint cp=new ColorPoint(5,5,"YELLOW");
cp.setXY(10,20);
cp.setColor("RED");
String str=cp.toString();
System.out.println(str+"입니다.");
}
}
6. Point를 상속받아 색을 가진 점을 나타내는 ColorPoint 클래스를 작성하라. 다음 main( ) 메소드를 포함하고 실행 결과와 같이 출력되게 하라.
public static void main(String[] args) {
	ColorPoint zeroPoint=new ColorPoint(); // (0,0) 위치의 BLACK 색 점
	System.out.println(zeroPoint.toString()+"입니다.");

	ColorPoint cp=new ColorPoint(10,10); // (10,10) 위치의 BLACK 색 점
	cp.setXY(5,5);
	cp.setColor("RED");
	System.out.println(cp.toString()+"입니다.");
}
--출력--
BLACK색의 (0,0)의 점입니다.
RED색의 (5,5)의 점입니다.public class ColorPoint extends Point {
private String color;
ColorPoint() {
super(0,0);
this.color="BLACK";
}
ColorPoint(int x,int y) {
super(10,10);
this.color="BLACK";
}
public String toString() {
return (color+"색의 ("+getX()+","+getY()+")의 점");
}
void setXY(int x, int y) {move(x,y);}
void setColor(String color) {this.color=color;}
public static void main(String[] args) {
ColorPoint zeroPoint=new ColorPoint();
System.out.println(zeroPoint.toString()+"입니다.");
ColorPoint cp=new ColorPoint(10,10);
cp.setXY(5,5);
cp.setColor("RED");
System.out.println(cp.toString()+"입니다.");
}
}
7. Point를 상속받아 3차원의 점을 나타내는 Point3D 클래스를 작성하라. 다음 main( ) 메소드를 포함하고 실행 결과와 같이 출력되게 하라.
public static void main(String[] args) {
	Point3D p=new Point3D(1,2,3); // 1, 2, 3은 각각 x, y, z축의 값.
	System.out.println(p.toString()+"입니다.");

	p.moveUp(); // z 축으로 위쪽 이동
	System.out.println(p.toString()+"입니다.");

	p.moveDown(); // z 축으로 아래쪽 이동
	p.move(10, 10); // x, y 축으로 이동
	System.out.println(p.toString()+"입니다.");

	p.move(100, 200, 300); // x, y, z 축으로 이동
	System.out.println(p.toString()+"입니다.");
	}
--출력--
(1,2,3)의 점입니다.
(1,2,4)의 점입니다.
(10,10,3)의 점입니다.
(100,200,300)의 점입니다.public class Point3D extends Point{
private int z;
Point3D(int x, int y, int z) {
super(x,y);
this.z=z;
}
public String toString() {
return ("("+getX()+","+getY()+","+this.z+")의 점");
}
public void moveUp() {
this.z++;
}
public void moveDown() {
this.z--;
}
protected void move(int x, int y, int z) {
super.move(x,y);
this.z=z;
}
public static void main(String[] args) {
// TODO Auto-generated method stub
Point3D p=new Point3D(1,2,3);
System.out.println(p.toString()+"입니다.");
p.moveUp();
System.out.println(p.toString()+"입니다.");
p.moveDown();
p.move(10, 10);
System.out.println(p.toString()+"입니다.");
p.move(100, 200, 300);
System.out.println(p.toString()+"입니다.");
}
}
8. Point를 상속받아 양수의 공간에서만 점을 나타내는 PositivePoint 클래스를 작성하라. 다음 main( ) 메소드를 포함하고 실행 결과와 같이 출력되게 하라.
public static void main(String[] args) {
	PositivePoint p= new PositivePoint();
	p.move(10,10);
	System.out.println(p.toString()+"입니다.");

	p.move(-5, 5); // 객체 p는 음수 공간으로 이동되지 않음
	System.out.println(p.toString()+"입니다.");

	PositivePoint p2=new PositivePoint(-10, -10);
	System.out.println(p2.toString()+"입니다.");
}
--출력--
(10,10)의 점입니다.
(10,10)의 점입니다.
(0,0)의 점입니다.
힌트 :
Point 클래스의 move( )를 PositivePoint 클래스에서 오버라이딩하여 재작성하고 적절히 super.move( )를 호출해야 한다. PositivePoint의 2 개의 생성자에서도 적절히 super( ) 생성자와 super.move( )를 호출해야 한다.
public class PositivePoint extends Point {

	PositivePoint () {
		super(0,0);
	}

	PositivePoint(int x, int y) {
		super(0,0);
		move(x, y);
	}

	public String toString() {
		int x=getX();
		int y=getY();
		String str="("+x+","+y+")의 점";
		return str;
	}

	@Override
	protected void move(int x, int y) {
		if ((x>0)&&(y>0))
			super.move(x, y);
	}

	public static void main(String[] args) {
		// TODO Auto-generated method stub

		PositivePoint p= new PositivePoint();
		p.move(10,10);
		System.out.println(p.toString()+"입니다.");

		p.move(-5, 5);
		System.out.println(p.toString()+"입니다.");

		PositivePoint p2=new PositivePoint(-10, -10);
		System.out.println(p2.toString()+"입니다.");
	}

}
9. 다음 Stack 인터페이스를 상속받아 실수를 저장하는 StringStack 클래스를 구현하라.
public interface Stack {
	int length(); //현재 스택에 저장된 개수 리턴
	int capacity(); //스택의 전체 저장 가능한 개수 리턴
	String pop(); //스택의 톱(top)에 저장된 문자열 리턴
	boolean push (String val); //스택의 톱(top)에 문자열 저장
}
내 생각 :
pop과 push 메소드에 달린 주석이 이상하다.
원래 주석은
//pop은 스택의 톱(top)에 실수 저장
//push는 스택의 톱(top)에 저장된 실수 리턴
그리고 다음 실행 사례와 같이 작동하도록 StackApp 클래스에 main( ) 메소드를 작성하라.
--출력--
총 스택 저장 공간의 크기 입력 >>3
문자열 입력 >> hello
문자열 입력 >> sunny
문자열 입력 >> smile
문자열 입력 >> happy
스택이 꽉 차서 푸시 불가!
문자열 입력 >> 그만
스택에 저장된 모든 문자열 팝 :smile sunny hello
import java.util.Scanner;
public class StackApp implements Stack{
private int top=0;
private String arr[];
StackApp(int size) {arr=new String[size];}
@Override
public int length() {return top;}
@Override
public int capacity() {return arr.length;}
@Override
public String pop() {
String val;
if (top==0)
val="0";
else {
top--;
val=arr[top];
}
return val;
}
@Override
public boolean push (String val) {
if (top==arr.length)
return false;
else {
arr[top]=val;
top++;
return true;
}
}
void run() {
Scanner scan=new Scanner(System.in);
while(true) {
System.out.print("문자열 입력 >> ");
String val=scan.next();
if (val.equals("그만"))
break;
else {
boolean bool=push(val);
if (bool==false)
System.out.println("스택이 꽉 차서 푸시 불가!");
}
}
System.out.print("스택에 저장된 모든 문자열 팝 :");
while (true) {
String val=pop();
if (val.equals("0")) {
System.out.println();
break;
}
else
System.out.print(val+" ");
}
}
public static void main(String[] args) {
// TODO Auto-generated method stub
Scanner scan=new Scanner(System.in);
System.out.print("총 스택 저장 공간의 크기 입력 >>");
int size=scan.nextInt();
StackApp sa=new StackApp(size);
sa.run();
}
}
10. 다음은 키와 값을 하나의 아이템으로 저장하고 검색 수정이 가능한 추상 클래스가 있다.
abstract class PairMap {
	protected String keyArray []; //key 들을 저장하는 배열
	protected String valueArray []; //value 들을 저장하는 배열
	abstract String get(String key); //key 값을 가진 value를 리턴, 없으면 null 리턴
	abstract void put(String key, String value); //key와 value를 쌍으로 저장. 기존에 key가 있으면, 값을 value로 수정
	abstract String delete(String key); //key 값을 가진 아이템(value와 함께) 삭제. 삭제된 value 값 리턴
	abstract int length(); //현재 저장된 아이템 개수 리턴
}
PairMap을 상속받는 Dictionary 클래스를 구현하고, 이를 다음과 같이 활용하는 main( ) 메소드를 가진 클래스 DictionaryApp도 작성하라.
public static void main(String[] args) {
	Dictionary dic=new Dictionary(10);
	dic.put("황기태", "자바");
	dic.put("이재문", "파이선");
	dic.put("이재문", "C++"); //이재문의 값을 C++로 수정
	System.out.println("이재문의 값은 "+dic.get("이재문"));
	System.out.println("황기태의 값은 "+dic.get("황기태"));
	dic.delete("황기태"); //황기태 아이템 삭제
	System.out.println("황기태의 값은 "+dic.get("황기태")); //삭제된 아이템 접근
}
--출력--
이재문의 값은 C++
황기태의 값은 자바
황기태의 값은 nullpublic class Dictionary extends PairMap {
Dictionary(int arrLength) {
keyArray=new String[arrLength];
valueArray=new String[arrLength];
for(int i=0;i<arrLength;i++) {
keyArray[i]="null"; /*나중에 keyArray의 값과 입력 받은 key의 값을 비교하기 위해서
"null" 문자열로 초기화해준다.*/
valueArray[i]="null";
}
}
@Override
public String get(String key) {
String ans="null";
for (int i=0;i<keyArray.length;i++)
if (keyArray[i].equals(key))
ans=valueArray[i];
return ans;
}
@Override
public void put(String key, String value) {
int i;
for (i=0;i<keyArray.length;i++)
if (keyArray[i].equals(key)) { //기존의 key 값이 있는 경우
valueArray[i]=value;
break;
}
if (i==keyArray.length) {//기존의 key 값이 없는 경우
int j;
for (j=0;j<keyArray.length;j++)
if (keyArray[j].equals("null")) { //배열에 남은 공간이 있으면 저장
keyArray[j]=key;
valueArray[j]=value;
break;
}
if (j==keyArray.length) /*배열에 남은 공간이 없으면
(문제에서 제시한 main메소드 대로 구현한다면 필요없는 조건)*/
System.out.println("Dictionary full");
}
}
@Override
public String delete(String key) {
String str="null";
for (int i=0;i<keyArray.length;i++)
if (keyArray[i].equals(key)) {
str=valueArray[i];
keyArray[i]="null";
valueArray[i]="null";
}
return str;
}
@Override
public int length() {
int count=0;
for (int i=0;i<keyArray.length;i++) {
if (keyArray[i].equals(null)); //null 상태면 그냥 넘어감
else //뭔가 저장되어 있으면 count를 늘려준다
count++;
}
return count;
}
}public class DictionaryApp {
public static void main(String[] args) {
// TODO Auto-generated method stub
Dictionary dic=new Dictionary(10);
dic.put("황기태", "자바");
dic.put("이재문", "파이선");
dic.put("이재문", "C++"); //이재문의 값을 C++로 수정
System.out.println("이재문의 값은 "+dic.get("이재문"));
System.out.println("황기태의 값은 "+dic.get("황기태"));
dic.delete("황기태"); //황기태 아이템 삭제
System.out.println("황기태의 값은 "+dic.get("황기태")); //삭제된 아이템 접근
}
}
11. 철수 학생은 다음 3개의 필드와 메소드를 가진 4개의 클래스 Add, Sub, Mul, Div를 작성하려고 한다(4장 실습문제 11 참고)
- int 타입의 a, b 필드: 2개의 피연산자
- void setValue(int a, int b): 피연산자 값을 객체 내에 저장한다.
- int calculate( ): 클래스의 목적에 맞는 연산을 실행하고 결과를 리턴한다.
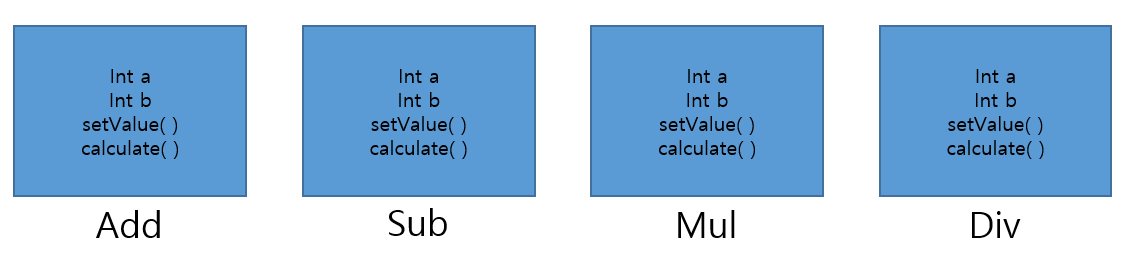
곰곰 생각해보니, Add, Sub, Mul, Div 클래스에 공통된 필드와 메소드가 존재하므로 새로운 추상 클래스 Calc를 작성하고 Calc를 상속받아 만들면 되겠다고 생각했다. 그리고 main( ) 메소드에서 다음 실행 사례와 같이 2개의 정수와 연산자를 입력받은 후, Add, Sub, Mul, Div 중에서 이 연산을 처리할 수 있는 객체를 생성하고 setValue( )와 calculate( )를 호출하여 그 결과 값을 화면에 출력하면 된다고 생각하였다. 철수처럼 프로그램을 작성하라.
--출력--
두 정수와 연산자를 입력하시오>>5 7 +
12
abstract class Calc {
protected int a;
protected int b;
abstract void setValue(int a, int b);
abstract int calculate();
}class Add extends Calc {
Add(int a, int b) {setValue(a,b);}
public void setValue(int a, int b) {this.a=a; this.b=b;}
public int calculate() {return a+b;}
}class Sub extends Calc {
Sub(int a, int b) {setValue(a,b);}
public void setValue(int a, int b) {this.a=a; this.b=b;}
public int calculate() {return a-b;}
}class Mul extends Calc {
Mul(int a, int b) {setValue(a,b);}
public void setValue(int a, int b) {this.a=a; this.b=b;}
public int calculate() {return a*b;}
}class Div extends Calc {
Div(int a, int b) {setValue(a,b);}
public void setValue(int a, int b) {this.a=a; this.b=b;}
public int calculate() {return a/b;}
}import java.util.Scanner;
public class Calculater {
public static void main(String[] args) {
// TODO Auto-generated method stub
Scanner scan=new Scanner(System.in);
System.out.print("두 정수와 연산자를 입력하시오>>");
int a=scan.nextInt();
int b=scan.nextInt();
String oper=scan.next();
switch (oper) {
case "+":
Add add=new Add(a,b);
System.out.println(add.calculate());
break;
case "-":
Sub sub=new Sub(a,b);
System.out.println(sub.calculate());
break;
case "*":
Mul mul=new Mul(a,b);
System.out.println(mul.calculate());
break;
case "/":
Div div=new Div(a,b);
System.out.println(div.calculate());
break;
}
}
}
12. 텍스트로 입출력하는 간단한 그래픽 편집기를 만들어보자. 본문 5.6절과 5.7절에서 사례로 든 추상 클래스 Shape과 Line, Rect, Circle 클래스 코드를 잘 완성하고 이를 활용하여 아래 시행 예시처럼 "삽입", "삭제", "모두 보기", "종료"의 4가지 그래픽 편집 기능을 가진 클래스 GraphicEditor을 작성하라.
--출력--
그래픽 에디터 beauty을 실행합니다.
삽입(1), 삭제(2), 모두 보기(3), 종료(4)>>1
Line(1), Rect(2), Circle(3)>>2
삽입(1), 삭제(2), 모두 보기(3), 종료(4)>>1
Line(1), Rect(2), Circle(3)>>3
삽입(1), 삭제(2), 모두 보기(3), 종료(4)>>3
Rect
Circle
삽입(1), 삭제(2), 모두 보기(3), 종료(4)>>2
삭제할 도형의 위치>>3
삭제할 수 없습니다.
삽입(1), 삭제(2), 모두 보기(3), 종료(4)>>4
beauty을 종료합니다.
힌트 :
Shape을 추상 클래스로 작성한 사례는 다음과 같다.
public abstract class Shape {
	private Shape next;
	public Shape() {next=null;}
	public void setNext(Shape obj) {next=obj;} // 링크 연결
	public Shape getNext() {return next;}
	public abstract void draw(); // 추상 메소드
}
class Line extends Shape {
public void draw() {System.out.println("Line");}
}
class Rect extends Shape {
public void draw() {System.out.println("Rect");}
}
class Circle extends Shape {
public void draw() {System.out.println("Circle");}
}
import java.util.Scanner;

public class GraphicEditor {
	static int count=0;
	Shape start, last, obj, next_obj;

	void insert() {
		Scanner scan=new Scanner(System.in);
		System.out.print("Line(1), Rect(2), Circle(3)>>");
		int c=scan.nextInt();

		if (count==0) {
			if (c==1)
				start=new Line();
			else if (c==2)
				start=new Rect();
			else
				start=new Circle();
			last=start;
		}
		else {
			if (c==1)
				obj=new Line();
			else if (c==2)
				obj=new Rect();
			else
				obj=new Circle();
			last.setNext(obj);
			last=obj;
		}
		count++; //몇 번째 삽입인지 알 수 있음.
	}

	void delete() {
		Scanner scan=new Scanner(System.in);
		System.out.print("삭제할 도형의 위치>>");
		int order=scan.nextInt();

		if (order>count)
			System.out.println("삭제할 수 없습니다.");
		else {
			if (order==1) {//첫번째 그래픽을 삭제할 경우
				if (last==start)//그래픽이 하나 밖에 없을 경우
					last=start=null;
				else //그래픽이 한개 이상일 경우
					start=start.getNext();
			}
			else if (order==count) { //마지막 그래픽을 삭제할 경우
				obj=start;
				next_obj=obj.getNext();
				for (int i=2;i<order;i++) {
					obj=next_obj;
					next_obj=next_obj.getNext();
				}
				obj.setNext(null);
			}
			else {//첫번째나 마지막이 아닌 그래픽을 삭제할 경우
				obj=start;
				next_obj=obj.getNext();
				for (int i=2;i<order;i++) {
					obj=next_obj;
					next_obj=next_obj.getNext();
				}
				obj.setNext(next_obj.getNext());
			}
			count--;
		}
	}

	void printAll() {
		if (count==0)
			System.out.println("나타낼 그래픽이 존재하지 않습니다.");
		else if (count==1)
			start.draw();
		else {
			start.draw();
			obj=start.getNext();
			for (int i=2;i<count;i++) {
				obj.draw();
				obj=obj.getNext();
			}
			obj.draw();
		}
	}

	public static void main(String[] args) {
		// TODO Auto-generated method stub
		Scanner scan=new Scanner(System.in);
		int test=1;
		int c=0;

		System.out.println("그래픽 에디터 beauty을 실행합니다.");
		GraphicEditor ge=new GraphicEditor();

		while (test==1) {
			System.out.print("삽입(1), 삭제(2), 모두 보기(3), 종료(4)>>");
			c=scan.nextInt();

			switch (c) {
			case 1:
				ge.insert();
				break;
			case 2:
				ge.delete();
				break;
			case 3:
				ge.printAll();
				break;
			case 4:
				System.out.println("beauty을 종료합니다.");
				test=0;
				break;
			}
		}
	}

}
내 생각 :
이 문제는 구조를 딱 잡고 풀지 못했다.
클래스들 상속받고 insert 메소드까지만 처음부터 구조를 잡고 풀 수 있었고,
delete메소드나 printAll 메소드는 출력 값 보고 왜 이렇게 나오는지 생각하면서 조금조금씩 고쳐서 풀었다.
그래서 코드도 가독성이 좋지 못하고 엉망진창인 감이 없지 않아 있는데...
그래도 다 수정하고 난 뒤에 구조를 어느 정도 이해하고 원하는 대로 돌아가는 것만으로 일단 만족.
일단 전체적인 구조는 linked list로 생각하고 구현하면 된다.
각 노드를 연결하는 insert 메소드와 첫번째 노드, 중간 노드, 마지막 노드를 삭제해주는 delete 메소드도 linked list를 구현할 때 쓰는 알고리즘을 사용하면 된다.
13. 다음은 도형의 구성을 묘사하는 인터페이스이다.
interface Shape {
	final double PI = 3.14; //상수
	void draw(); //도형을 그리는 추상 메소드
	double getArea(); //도형의 면적을 리턴하는 추상 메소드
	default public void redraw() { //디폴트 메소드
		System.out.print("--- 다시 그립니다. ");
		draw();
	}
}
다음 main( ) 메소드와 실행 결과를 참고하여, 인터페이스 Shape을 구현한 클래스 Circle를 작성하고 전체 프로그램을 완성하라.
public static void main(String[] args) {
		Shape donut=new Circle(10); // 반지름이 10인 원 객체
		donut.redraw();
		System.out.println("면적은 "+donut.getArea());
	}
--출력--
--- 다시 그립니다. 반지름이 10인 원입니다.
면적은 314.0public class Circle implements Shape {
private int radius;
private double area;
Circle (int radius) {
this.radius=radius;
area=this.radius*this.radius*PI;
}
public void draw() {
System.out.println("반지름이 "+radius+"인 원입니다.");
}
public double getArea() {
return area;
}
public static void main(String[] args) {
// TODO Auto-generated method stub
Shape donut=new Circle(10);
donut.redraw();
System.out.println("면적은 "+donut.getArea());
}
}
14. 다음 main( ) 메소드와 실행 결과를 참고하여, 문제 13의 Shape 인터페이스를 구현한 클래스 Oval, Rect를 추가 작성하고 전체 프로그램을 완성하라.
public static void main(String[] args) {
	Shape [] list= new Shape[3]; // Shape을 상속받은 클래스 객체의 래퍼런스 배열
	list[0]= new Circle(10); // 반지름이 10인 원 객체
	list[1]= new Oval(20, 30); // 20x30 사각형에 내접하는 타원
	list[2]= new Rect(10, 40); // 10x40 크기의 사각형

	for (int i=0; i<list.length; i++) list[i].redraw();
	for (int i=0; i<list.length;i++) System.out.println("면적은 "+list[i].getArea());
}
--출력--
--- 다시 그립니다. 반지름이 10인 원입니다.
--- 다시 그립니다. 20x30에 내접하는 타원입니다.
--- 다시 그립니다. 10x40크기의 사각형 입니다.
면적은 314.0
면적은 1884.0
면적은 400.0public class Oval implements Shape {
private int radius1;
private int radius2;
private double area;
Oval (int radius1, int radius2) {
this.radius1=radius1;
this.radius2=radius2;
area=radius1*radius2*PI;
}
public void draw() {
System.out.println(radius1+"x"+radius2+"에 내접하는 타원입니다.");
}
public double getArea() {return area;}
}public class Rect implements Shape {
private int width;
private int height;
private double area;
Rect (int width, int height) {
this.width=width;
this.height=height;
area=this.width*this.height;
}
public void draw() {
System.out.println(width+"x"+height+"크기의 사각형 입니다.");
}
public double getArea() {return area;}
public static void main(String[] args) {
// TODO Auto-generated method stub
Shape [] list= new Shape[3];
list[0]= new Circle(10);
list[1]= new Oval(20, 30);
list[2]= new Rect(10, 40);
for (int i=0; i<list.length; i++)
list[i].redraw();
for (int i=0; i<list.length;i++)
System.out.println("면적은 "+list[i].getArea());
}
}
Open Challenge Bear의 Fish 먹기 게임 만들기
이 게임에는 Bear와 Fish 객체가 등장하며, 이들은 10행 20열의 격자판에서 각각 정해진 규칙에 의해 움직인다. Bear는 사용자의 키에 의해 왼쪽(a 키), 아래(s 키), 위(d 키), 오른쪽(f 키)으로 한 칸씩 움직이고, Fish는 다섯 번 중 세 번은 제자리에 있고, 나머지 두 번은 4가지 방향 중 랜덤 하게 한 칸씩 움직인다. 게임은 Bear가 Fish를 먹으면(Fish의 위치로 이동) 성공으로 끝난다. 다음은 각 객체의 이동을 정의하는 move( )와 각 객체의 모양을 정의하는 getShape( )을 추상 메소드로 가진 추상 클래스 GameObject이다. GameObject를 상속받아 Bear와 Fish 클래스를 작성하라. 그리고 전체적인 게임을 진행하는 Game 클래스와 main( ) 함수를 작성하고 프로그램을 완성하라.
public abstract class GameObject { //추상 클래스
	protected int distance; // 한 번 이동 거리
	protected int x, y; //현재 위치(화면 맵 상의 위치)
	public GameObject(int startX, int startY, int distance) { // 초기 위치와 이동 거리 설정
		this.x = startX;
		this.y = startY;
		this.distance = distance;
	}
	public int getX() { return x; }
	public int getY() { return y; }
	public boolean collide(GameObject p) { //이 객체가 객체 p와 충돌했으면 true 리턴
		if(this.x == p.getX() && this.y == p.getY())
			return true;
		else
			return false;
	}
	protected abstract void move(); // 이동한 후의 새로운 위치로 x, y 변경
	protected abstract char getShape(); // 객체의 모양을 나타내는 문자 리턴
}
키가 입력될 때마다 Bear와 Fish 객체의 move( )가 순서대로 호출된다. 게임이 진행되는 과정은 다음 그림과 같으며, 게임의 종료 조건에 일치하면 게임을 종료한다.
--출력--
** Bear의 Fish 먹기 게임을 시작합니다.**
B---------
----------
----------
----------
----------
-----@----
----------
----------
----------
----------
왼쪽(a), 아래(s), 위(d), 오른쪽(f) >> s
----------
B---------
----------
----------
----------
-----@----
----------
----------
----------
----------
왼쪽(a), 아래(s), 위(d), 오른쪽(f) >> s
----------
----------
B---------
----------
----------
-----@----
----------
----------
----------
----------
왼쪽(a), 아래(s), 위(d), 오른쪽(f) >> s
<------------------------------------------------------중간 과정 생략------------------------------------------------------>
----------
----------
----------
----------
-----B@---
----------
----------
----------
----------
----------
왼쪽(a), 아래(s), 위(d), 오른쪽(f) >> f
----------
----------
----------
----------
------B---
----------
----------
----------
----------
----------
Bear wins!!
// 출력은 Fish가 랜덤으로 바뀌기 때문에 매번 다르다.
public class Bear extends GameObject {
	Scanner scan=new Scanner(System.in);
	Bear() {
		super(1,1,1);
	}

	@Override
	protected void move() {
		while (true) {
			System.out.print("왼쪽(a), 아래(s), 위(d), 오른쪽(f) >> ");
			String direction=scan.next(); //방향 입력
			switch (direction) {
			case "a": //왼쪽
				if (x>1) {
					x-=distance;
					break;
				}
				else { //x=1이라면 왼쪽으로 갈 수 없음
					System.out.println("더 이상 왼쪽으로 갈 수 없습니다. 다시 입력하세요.");
					scan.nextLine(); //scanner를 비워준다.
					continue;
				}
			case "s": //아래
				if (y<10) {
					y+=distance;
					break;
				}
				else { //y=10이라면 아래쪽으로 갈 수 없음
					System.out.println("더 이상 아래쪽으로 갈 수 없습니다. 다시 입력하세요.");
					scan.nextLine();
					continue;
				}
			case "d": //위
				if (y>1) {
					y-=distance;
					break;
				}
				else { //y=1이라면 위쪽으로 갈 수 없음
					System.out.println("더 이상 위쪽으로 갈 수 없습니다. 다시 입력하세요.");
					scan.nextLine();
					continue;
				}
			case "f": //오른쪽
				if (x<10) {
					x+=distance;
					break;
				}
				else { //x=10이라면 오른쪽으로 갈 수 없음
					System.out.println("더 이상 오른쪽으로 갈 수 없습니다. 다시 입력하세요.");
					continue;
				}
			}
			break;
		}
	}

	@Override
	protected char getShape() {
		return 'B';
	}
}
import java.util.*;
public class Fish extends GameObject {
Fish() {
super(6,6,1);
}
@Override
protected void move() {
while (true) {
int ran=(int)(Math.random()*4);
switch (ran) {
case 0: //왼쪽
if (x>1) {
x-=distance;
break;
}
else { //x=1이라면 왼쪽으로 갈 수 없음
System.out.println("더 이상 왼쪽으로 갈 수 없습니다. 다시 입력하세요.");
continue;
}
case 1: //아래
if (y<10) {
y+=distance;
break;
}
else { //y=10이라면 아래쪽으로 갈 수 없음
System.out.println("더 이상 아래쪽으로 갈 수 없습니다. 다시 입력하세요.");
continue;
}
case 2: //위
if (y>1) {
y-=distance;
break;
}
else { //y=1이라면 위쪽으로 갈 수 없음
System.out.println("더 이상 위쪽으로 갈 수 없습니다. 다시 입력하세요.");
continue;
}
case 3: //오른쪽
if (x<10) {
x+=distance;
break;
}
else { //x=10이라면 오른쪽으로 갈 수 없음
System.out.println("더 이상 오른쪽으로 갈 수 없습니다. 다시 입력하세요.");
continue;
}
}
break;
}
}
@Override
protected char getShape() {
return '@';
}
}import java.util.*;
public class Game {
Bear bear=new Bear();
Fish fish=new Fish();
void printMap() {
for(int i=1;i<=10;i++) {
for(int j=1;j<=10;j++) {
if ((i==bear.getY())&&(j==bear.getX())) //bear shape 출력
System.out.print(bear.getShape());
else if ((i==fish.getY())&&(j==fish.getX())) { //fish shape 출력
if (!bear.collide(fish)) /*bear.collide(fish)가 true라면 bear가 fish를 먹기 성공,
fish shape은 출력하지 않는다.*/
System.out.print(fish.getShape());
}
else
System.out.print("-");
}
System.out.println();
}
}
void playing() {
System.out.println("** Bear의 Fish 먹기 게임을 시작합니다.**");
printMap();
while (true) {
for (int i=1;i<=5;i++) {
if ((i==4)||(i==5)) //5번 중 4,5번째 일 때는 fish도 move
fish.move();
bear.move(); //bear는 매번 move
printMap();
if (bear.collide(fish))
break;
}
if (bear.collide(fish)) {
System.out.println("Bear wins!!");
break;
}
}
}
public static void main(String[] args) {
// TODO Auto-generated method stub
Game game=new Game();
game.playing();
}
}'Programming Language > Java' 카테고리의 다른 글
| 명품 JAVA Programming 제6강 자바 기본 프로그래밍 실습문제 (0) | 2020.08.22 |
|---|---|
| 명품 JAVA Programming 제4강 자바 기본 프로그래밍 실습문제 (0) | 2020.08.07 |
| 명품 JAVA Programming 제3강 자바 기본 프로그래밍 실습문제 (0) | 2020.07.22 |
| 명품 JAVA Programming 제2강 자바 기본 프로그래밍 실습문제 (0) | 2020.07.15 |